Fairy Yardmother Landscape Design

by Kathy Oberg, Landscape Designer, Central Coast CA.
FairyYardmother[at]gmail[dot]com

Thank you for visiting my site. I enjoy bringing you pictures of gardens, plants, and ideas from sunny California. I love sharing after-photos that show how my landscape plans, plant lists and layouts come to life.
As a designer, I use plants to create drama, provide color and form, and compliment the architectural style of your home.
I strive to provide a buffer from sun, street, and neighbors while still fostering connections.
Inspired plant choices and site layout can make any space a success.
I am a Certified Watershed Wise Professional, with techniques to improve soil health and keep more water on your property.
I can help you makeover your patio, paths, planting areas, or entire property. I will consult with you, choose a look you love, and compose a plan and plant list to update your landscape, re-using what you already have wherever we can.
Each project is different because it is about making your space really shine.


Showing posts with label Lawn Removal. Show all posts

Tuesday, December 22, 2015

Lawn Removal in Glendale California Cottage Garden

I can't wait to watch this garden grow in. My design plan transformed it from a virtually unused space into a place where the kids can play on stumps and stones, and their parents can sit in the DG patio and have a glass of wine, say hello to neighbors, or just unwind among the sweet fragrance of Roses and Salvias .

BEFORE (Google Maps)

AFTER 
(Newly Planted)
AFTER
(Four Months after Planting)


The clients wanted a lush Mediterranean garden with Lavenders, Nepeta, Iceberg Roses, and a DG sitting area and creek bed. Layers of taller and shorter plants along the street will create some screening without shutting out the neighborhood. I convinced them to replace the original pathway which was very narrow. Photos show the yard newly planted with relatively small plants, and the same plantings four months later in early Spring. If you plant in Fall/Winter, you can see a lot of growth in Spring, especially from your perennials.


BEFORE
AFTER
AFTER
(Four Months After Planting)

We used a simple sheet mulching method to encourage soil microbes and improve soil health. The roses may take a little extra water to get established, but they will be a little more drought-tolerant growing in such healthy soil. The landscape crew trimmed existing trees before planting, and that is why the house is more exposed in the after photos. Trees will fill in quickly, in time to give shade in Summer.

AFTER DETAIL
AFTER 
Wider Path to Front Door, Newly Planted
AFTER 
(Plants Filling In)

AFTER DETAIL 
(Four months after planting)

Saturday, December 5, 2015

Lawn Removal Hancock Park

Mother and son are already enjoying their new yard before we've finished the installation!


Child is hidden behind his Mother. He couldn't wait to explore his new front yard.

Saturday, May 30, 2015

Lawn Replacement Design Consultation

BEFORE
AFTER: Lawn Replacement Complete
For this project, the clients did all the work themselves. This was an unusual and fun way for me to provide Design Services. They called me in for a consultation as they were prepping for planting so I could guide them. When I arrived, they'd started placing plants in groups, and I had them change some of the groupings and suggested they buy a few more of the native Heuchera and Iris so they could mass them more effectively.

They were planning to use a high-quality plastic bender board product as a transition from the decomposed granite pathways and the mulched planting areas. Normally bender board is a reasonably good choice, but in this case, there were tree roots everywhere and it was going to be quite a challenge to dig channels for the bender board to lay at the correct level. This is also a shady front yard with a natural forest vibe, and the bender board was not going to add anything aesthetically.


BEFORE: Bender Board Instead of River Rock


Here is a photo of the Bender Board they were originally planning to use.

I suggested using River Rock instead of Bender Board, which can be placed closer to the soil surface, no significant channel necessary. I also recommended adding some large boulders. We talked about the placement of all the elements.


AFTER: Natural River Rock Borders

This was a great example of the value of a Design Consultation. The homeowners in this case were perfectly capable of doing the labor, and they had a good start on a plan, but I know they would agree that getting my advice allowed them to bring the project to completion with wonderful results. Call me to discuss the services I offer.

The clients sent me photos the moment they completed the project. They are so happy with the choices we made together, and they have already received so many compliments.

Thursday, May 21, 2015

Beverly & Fairfax Lawn Replacement Design


The goals here included new drought-tolerant plantings in place of the lawn, punctuated by large boulders, a new pathway from the sidewalk, and better access from the driveway.

When I arrived, the clients were considering removing the entire front wall along the front of the house because it was stifling the flow to the front door. The only way to enter the front door was from the driveway, along the back of this wall.


BEFORE

AFTER: New Pathway and Gate in Wall

After some discussion we decided to cut an opening in the center of the wall, preserving a nice part of the architecture of the house while still improving the flow. Taking out the Calliandra, which had become a large hedge along the wall, revealed a very pretty element of Spanish Architecture, and opened up the whole space.

BEFORE


AFTER: New Steps at Sidewalk, Newly Planted

We decided on steps that matched the tile in the front courtyard, and a lovely flagstone pathway.
The plantings are a nice mix of feminine and masculine forms. There will be lots of beneficial insects and Hummingbirds visiting this yard now!


Monday, March 23, 2015

Before and After: From Lawn to Succulents and More


Here is another lawn conversion that gave this home a significant update. The client wanted room between plants. Plants were planted about 4 months ago, so they are just starting to fill in. There will be a lot more flowers as Spring goes on, and the plants will really fill out over the next few years.


Before (Google Maps)


The lawn was patchy and the shrubs were dated.
The client wanted a nice mix of succulents, especially Aloes, with some low-water, flowering perennials.

After

After Detail


We continued the boulder motif, inspired by a couple large boulders already on site. We brought them out of hiding, and added more. The small boulders help fill in space while the plants are small.

Wednesday, May 21, 2014

From Front Lawn to Low-Maintenance Front Yard

On this project, I designed a new pathway to improve the flow from the driveway and sidewalk to the front door of the home. We opened up access to the beautiful front archway for a more direct path to the front door. We planted some wonderful drought-tolerant plants, and helped the homeowner get her lawn-removal rebate.

BEFORE: Front Lawn with no path to front door

AFTER: Pathway to Door and New Plantings
Access to the front door through the previously hidden archway makes the property more inviting, brings out the Spanish architecture, and improves access from the sidewalk and driveway. The plant material will fill in over the next 2 to 3 years, giving a lot of privacy from the sidewalk and street.

AFTER: CA Native, Carex Pansa in center of DG circle


We wanted to mix some tough tropicals with ornamental grasses and succulents. It's a fun combination that wouldn't work many places outside of SoCal! As the plants grow in, the homeowner will have a beautiful, yet private view from her front windows, and a nice buffer from the street.

Wednesday, May 14, 2014

Los Feliz/Franklin Hills Back Yard Makeover

We started with a yard that was divided. One side is a re-purposed driveway that serves as a sunken stone patio. The other side was a large rectangle of struggling lawn with no real connection to the stone patio.


Before
After: Continuation of lower patio

We continued the steps from the lower level to the upper level, matching the existing High Desert stone work. We added River Rock boulders along a new decomposed granite pathway, all helping to create a more cohesive space, and improved flow from the lower and upper areas.


Before
After: New Plants, Gravel, DG and River Rock accents
I chose tough, drought tolerant plants, which flower and attract lots of bees, butterflies, and hummingbirds. The shade plants will cover the repaired back wall within a year. The clients wanted quite a few places to sit, so we extended the covered patio with a gravel pad, and the decomposed granite path can serve as additional sitting area.

Monday, March 17, 2014

Eagle Rock Patio


AFTER: The Lower Area of the yard is now an entertaining area
BEFORE: Lower Area


BEFORE: Existing Patio not easy to access


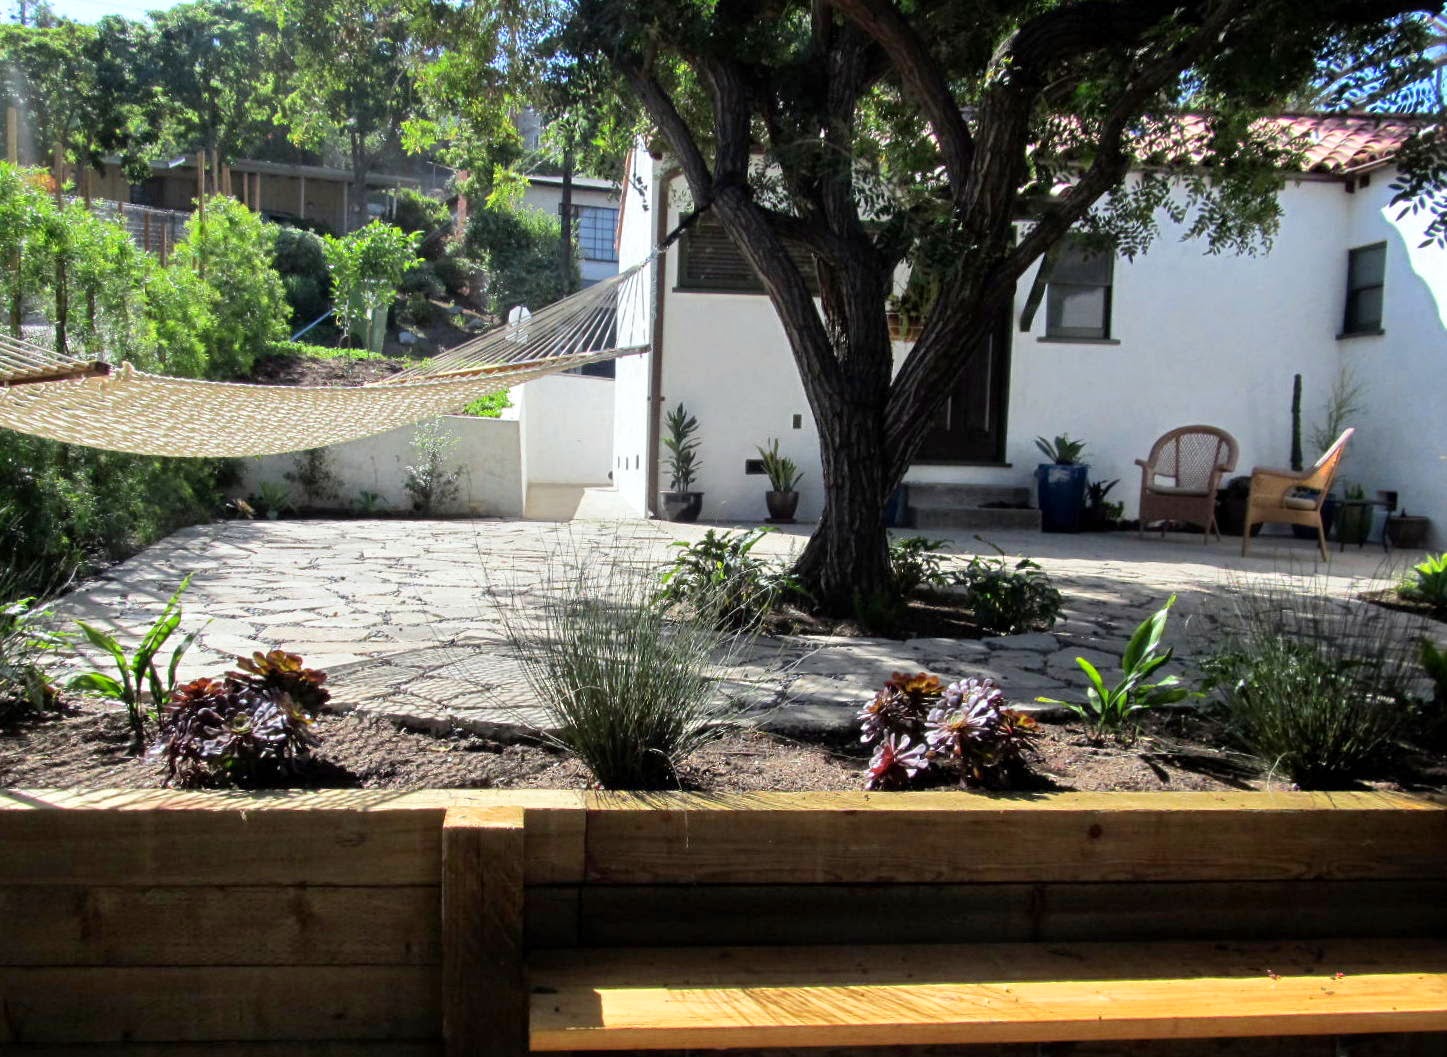
This project entailed a few Design challenges. The house was recently purchased. In the client's only private yard space he had a small patio that was easily accessible from the bedroom only (door on left under overhang), but not from the kitchen nor any other room of the house.


Turf was planted on a sloping area adjacent to the existing patio when the house was put on the market. But this lawn was not practical. The shady area under a Pepper Tree was often muddy and difficult to traverse.

We removed the lawn, leveled the slope, and used broken concrete pieces to extend the living area. The client benefited from a turf removal rebate.


AFTER: Extended Patio, Better Access from Kitchen

BEFORE: From Kitchen to Patio, Muddy Slope
AFTER: Steps from Kitchen to Patio


AFTER:  Same Steps from Kitchen and Lower Area to Upper Patio
BEFORE: Slope with no pathway
AFTER: Enlarged Level Patio with Steps 
BEFORE: Under-utilized Space


AFTER: Retaining Wall, Level Upper Area

Now the client is spending every weekend in his new yard! The retaining wall allowed us to make best use of the upper space, creating a level extension of the patio, and greatly improving the flow between the upper and lower levels of the yard, and the house.

I chose many tough, shade-tolerant plants for this project because of the tree cover. We also removed very old Cypress, and planted a new hedge all along the property line. Within a couple years, the plant material will be lush and wonderfully soft, with some sculptural elements like the Agave, Chondropetalum, and Aeonium.